Think outside the box, Experience new things.... Be a kid again!

Monday, July 11, 2011

At the Seaside

Summer has finally (hopefully) decided to stick around. Our family loves to go to the beach and we've come up with some pretty darn cute craft projects to do when we get home. It's a great way to remember our vacation. I always put my son's name and age on the back, just to preserve the memory!

First on the beach craft to-do list are these adorable shell critters. I soak the shells in a little bleach and water solution overnight to get the clean white look. Although we've painted them in our house too, they get a tie dye effect! I used fimo clay (the stuff you bake) because it's already colored which makes it super easy. You could always make your own salt dough, dry it and paint it.

Did you see my past blog about mobiles?
Making mobiles
Here's a great use for those shells! Both my son and hubby love to collect shells and rocks, here's a great way to display those shells!

I seems like there are lots of stores celebrating Christmas in July. Here's a great way to get some Christmas presents done early!

Just take some sand dollars, let your kiddo paint on them (it doesn't have to be a poinsettia) put a little super glue and ribbon on the back and viola you've got an ornament. It'll work with any shell and remind you of your great beach vacations when it's super cold and snowy outside!

Wednesday, July 6, 2011

It's 80 Degrees in Washington

... and that alone is enough reason to celebrate. While my son plays outside in our over sized toddler pool I figured it would be a great chance to me to sit down and do some writing. I missed the 4th of July for posting but first of all I need to share this super cool popsicle idea. Days later my son is still asking me for popsicles - and he doesn't mean the sugar kind!

I had a picture of my son eating these, but of course I can't find it now. Figures! -- I took watermelon and cut it hamburger style. I then took a star cookie cutter and cut stars out of the watermelon. I set the stars in the freezer for 10 minutes or until they were a little hard & then skewered them! My son is still asking me about the popsicles, we had a friend bring Dilly Pops from Dairy Queen and he doesn't want them. He prefers the watermelon pops.... This is definitely a score one for any mom, healthy & hydrating! I did a little reading & people have done it with pineapple too, I haven't tried it but sounds like something for a later blog.


We enjoy some fab ways to keep cool. We really enjoyed playing in colored ice cubes. The night before I stuck some food coloring (which just happened to be left over red & blue!) in my ice cube trays in the freezer. My son had a friend over and I gave both of them a bowl of water with some added colored cubes. They splashed around for a good 25 minutes while the ice melted. At one point they were splashing each other... kids will be kids, don't forget the towels! To make the project even more fun you can add things to the cubes, I loved to use toy cars or soldiers in my preschool room. We also made some bigger ice chunks out of buckets. These take up quite a bit of room in the freezer but they're well worth it in the morning!


Tuesday, May 31, 2011

It's ALMOST summertime

My summertime promise to myself is to blog more. I have so many ideas I can't wait to share! Due to a recent separation between my job and I (no worries, it's a good thing) I'm enjoying life as a stay at home mom. It also frees up some time to do the things that I love, like writing and sharing ideas that I'm passionate about. So off to the summer projects....


This first project is such a cool project. I was originally going to post it for Mother's Day ideas, but well - you see how that went.

Creating a Hanging Mobile
Materials:
* Sticks ( 3 sets of two about equally sized)
* Flowers (I used fake so it would last)
* Organic Stuff (leaves, pine cones, rocks...)
* Shells
* Beads
 -- use your imagination, anything & everything can go on this mobile.
* Wire (I used flower wire, but anything would work)
* Wire Cutters

First thing to do is to take your sticks and put them in order biggest to smallest. Take the two biggest and put them together in a cross. Create a loop at the top so you are able to hang your mobile. Use the wire to secure them. Continue with the other two sets of sticks. Now it's time to secure the sticks to each other. I've found the easiest way to do this is to hang the mobile from somewhere. It saves you the headache of balancing it later. Put the largest cross on top and work your way down with wire in between the crosses. Using wire is way easier than things like fishing line, it is just sturdier! Now take all your organic materials, beads and stuff to put on and wrap it with wire. Attach to the crosses - I used my wire cutters and a pencil to make some cute curly cues off of the wire too. I also found it helpful to use a dab of super glue on the things like rocks & shells. If you want to keep this long term it definitely helps! This is definitely a very parent / teacher involved project but is so super cute when it's done!

This is a WAY simplified version made out of a single flower and some Popsicle sticks. I let the kids glue it, but while they were sleeping added a touch of super glue to keep the sticks together. These would look super cute hanging in a window!

Don't forget about sidewalk chalk this summer! It's the best -- I've made it out of eggshells before but this is just plain old Wal Mart $3 Crayola. My son is 2 1/2 and had a great time helping me decorate the cul-de-sac with some fun summer stuff. It was a great opportunity to talk about shapes too!

Eggshell Chalk (i've never had AMAZING luck with this one, it always turns out stinky, but it's worth giving a try again!)

Materials:
12 Egg Shells
2 Tsp Hot Water
2 Tsp Flour

Wash the eggshells well, so they don't have any egg left in them. Dry them and grind them (I stick them in a zip lock & give it to my son to smash). . Grind the eggshells into a fine powder. You'll need two soup spoonfuls of this powder to make a stick of chalk. When you have enough powder to make a stick of chalk, sift or pick out any little bits of eggshell that are still not ground up and throw them away.Dump the powder on to a plate and remove any big clumps.
Stir the flour and hot water together in a small dish to make a paste. Put two soup spoonfuls of eggshell powder into the paste and mix well.. Add a few drops of food coloring if you want colored chalk.
Shape this mixture into a chalk stick. Then roll it up in a strip of paper towel and set aside to dry. (Drying takes about three days.) Then just peel the paper off one end and you're ready for some sidewalk art.
For really big sticks of chalk, try making 3 times this recipe, and stuff the mixture into an old toilet paper tube. When it's dry, you can peel away the cardboard as you use it.

Good Luck -- I made mine with hard boiled eggs on egg salad day at the daycare, that might just be why it was stinky! 

Tuesday, March 1, 2011

Fire Station Fieldtrip - Complete with a Fire Dog!

I am so excited for next week. Our center has adopted a new curriculum that I couldn't be more enthusiastic about. We are doing "Community" as the overall theme with lots of smaller, but related themes within -- The next two weeks are Community Helpers. On Tuesday we have a fire dog coming in (actually my co-teacher's sister has a dalmatian to bring and share!). We are going to spend the entire day talking about fire dogs and even top the day off with the math project of counting the Dalmatian spots! The next day we are going to hit up the fire station next door... the entire center! Yep, that's right, toddlers and all - I'm really hoping to create a bond with the fire station next door and get the kids hooked up with some firefighter hats fairly often. More often than not when the firefighters are outside my kids are running to the fence on the playground to say hi... I'd love for there to be a relationship between the kids & the firefighters --- now it's just a matter of figuring out how!
I'm also excited that we are going to be doing some construction worker stuff too. We are hoping to have a real live construction worker come in, with tools and all. Perhaps if we're lucky he'll have a construction work truck too! Trucks make everything more exciting. I can't wait to talk about garbage men (and women!), librarians, supermarket checkers and everyone else who helps out and makes our community a community! We also have the King County Library Bus coming to visit for the first time, this will be a part of the Community Vehicles week. -- Okay, i'm going to stop gushing now, but i'm just SO EXCITED for our curriculum the next 8 weeks! -- I just realized this post should win for "post with the most exclamation marks!!  SOOOOOOO SUPER STOKED for a number of great weeks ahead!

Thursday, February 24, 2011

It's been awhile... i'm still here, I promise!

I know, it's been awhile. I seem to do these streaks where I write, write, write and then stop for a month. Well - lucky for you I'm back on the writing streak!

First off i've been attending some really interesting conferences lately. I would like to tell you how interesting this conference topic is... Preschoolers and reading. My company has been working with David Matteson (http://dmatteson.com/) to create a reading program for the center. If you haven't read his work any teacher, parent or person concerned for kid's future could learn a lot of information from him. It's well worth registering for the site. I've been doing this program in my classroom for over a month now and the kids are absolutely enthralled with the whole concept!

Lately in my classroom the kids have been all about the glue. They want to glue anything and everything and if they can paint on top of the glue it's even better! Here's a project I haven't done with this room in particular but have done in the past. SHELLS !!
 The kids adore the fact that they get to paint something they haven't painted before. They have all handled shells (because they're in my sensory area & we do live in Washington) but having the opportunity to paint on the shells is very exciting.

To keep with the gluing theme i've developed a great Art area. The area consists of two tables. One table is for the art products (paint, buttons, straws, glue, bells, markers... the list goes on forever!). I usually limit it to about 10 different types of art medium but find about 15 things by the time we're done because the kids will add things from the shelves. I put the stuff on the table with some paper, this is the prep table. The kids will walk over, get their paper and materials and happily collage away at the other table. This works out so well because they don't have the opportunity to argue over items. If David has the sequins and they aren't available on the able then Suzi will just have to wait until they are returned. It's a great lesson in patience, while enjoying some wonderful creativity. I also find that the short walk between tables will diffuse some anger when Suzi is going to ask David for the sequins. Those few seconds just seem to help the words come out much nicer! I love to hear those kind words among my preschool friends!

Please remember it's the process that the kids use to make the collage that teaches the important things, if the product turns out to be one big sticky mess please think about the glue that was squeezed to make the sticky mess, or the pincer grip used to pick up those super small sequins. These are so important in the later development of the children. The product might not look like it belongs on Lakeshore Learning's Website, but the things learned by creating the product are irreplaceable.

Speaking of fine motor.... I just purchased these tweezers at Discount School Supply (www.discountschoolsupply.com). They are GREAT for those writing muscles!

Sunday, January 2, 2011

28 Degrees makes for some good INSIDE ART !!

We're in the middle of a cold snap here in Washington, which makes it perfect for some good, indoor art!

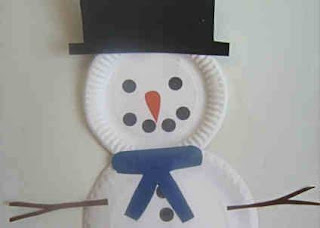
a paper plate is the perfect background for a snowman... You could even take a nature walk outside to pick out some features for your snowman. Some twigs and rocks always compliment a good snowman & make the project memories that much more special.

While your inside on this blustery day make some play dough -- this is home made play dough and I wouldn't recommend keeping it for more than two weeks. It doesn't have any preservatives so after two weeks it *could* mold. Also make sure you put it in a zip lock or a rubbermaid to keep it moist!

In a huge bowl (with your kid helping, of course!) mix the following:

4 Cups Flour
1/4 Cup Salt
1 1/2 Cup Water
1 Tbl Oil (this really is important, it makes things WAY less sticky!)

Add flour or water to make it the consistency you want. You can always add anything to it for a unique experience. Our center added cinnamon to the play dough this week, but we've added vanilla, alm, nutmeg -- sky is the limit here! Also you can use just about anything to tint the dough different colors, normally I use food coloring or paint - but you can use juices too like carrot for orange or beet juice for red! You could also add a packet of your favorite Kool-Aid, but be careful it tends to stain easier than the others