Think outside the box, Experience new things.... Be a kid again!

Sunday, October 24, 2010

The Pumpkin Patch

If you haven't gone to the Pumpkin Farm yet this year visit The Farm in Snohomish - my 2 year old son adored it. We actually went last weekend and I have been meaning to post about it ever since!

Back at the Preschool this week -- we're making spider candy holders for our Halloween Party on Friday.
https://blogger.googleusercontent.com/img/b/R29vZ2xl/AVvXsEiqYmatPFvOXhKLO10MqGdR6BjEX5__aDyG8WSk8jc0Xa8fkoXx4wXDWaQLst04REQ6Wi1OMkd4LNzNdWm0bjbCYm38wVEIr9fwaiPXy0b64Xx_OpT4qUP9flwsBU-cYyamltkEFRZ4JyA1/s320/paper+plate+spiders+007.JPG First off paint a paper plate black on both sides. I usually let the kids mix their own black - they love mixing paint anyway. Pre-cut the legs and when everything is dry cut the plate in half, and staple it all together. The kids love to help staple, plus it's great for their small motor skills. Glue on some wiggly eyes and your good to go with a great Halloween candy holder to take home. I'm planning on putting their names on the front and putting them on the wall so the kids can add their own candy as they please... but the rule stands - the candy goes in but doesn't come out.

http://en.wikivisual.com/images/9/99/Pumpkins.jpg 
5 Lil' Pumpkins Sitting on a Fence...
 The first one said " My it's getting late "
 The second one said " There's witches in the air "
 The third one said " We don't care "
 The fourth one said " Lets run and run and run "
 The fifth one said " Lets have some fun "
and whoooooooo went the wind and <clap> OUT when the lights
Five Lil' Pumpkins scurried out of sight !

Saturday, October 23, 2010

8 More Days Till Halloween

Our classroom count down is going. We have both rings and a numbers countdown going this year. Everyone is so super excited!

We made these great pumpkins out of colored Popsicle sticks with a little construction paper. Elmer's glue is great because it will dry clear. These things were covered with white when the kids finished them!


This is our classroom haunted house. We are remodeling at the daycare and this box was a discard. Imagine my excitement when my boss showed it to me! It was like Christmas instead of Halloween... I took some black plastic bags and stapled them on top, cut a door and instant haunted house. It's over by the shelf with the people and dinosaurs so the kids love to create their own scenes to play out.

Another classroom tree... I let the kids corn syrup paint the leaves and we wrote down what they thought of leaves. Some of the kids were super simple "Leaves Fall" while others proceeded to tell me the colors, how they fell... it turned into a great 1:1 conversation piece!

Monday, October 18, 2010

Fall Fun Begins With....

Everyone knows that fall fun begins with Preschool - this was a simple board with a blank tree. The leaves are the kids in my classroom's hands. They each sat down with me and talked about leaves. We traced their hands and stapled them to the tree. I'm planning on leaving it up for awhile and eventually turning it into a giving tree for Thanksgiving. You can also see the leaves I wrote about in yesterday's blog from farther away on the bottom and sides.


Fall fun also begins with undercover painting. The kids and I drew some common Halloween / Fall-ish stuff outside under our covered area. We talked about the spelling of the words and the letters as I drew. I handed the paint and sidewalk chalk over to the kids and they had some fun filling things in and drawing their own monsters. Tempera paint is the most amazing paint. You can buy it in bulk at many stores, although I am a huge fan of Lakeshore Learning  (http://www.lakeshorelearning.com) in Bellevue.

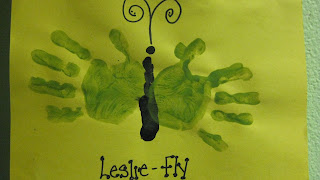
Okay, last project post for today -- Fall fun begins with BUGS. We made these great butterflies to add some color to our classroom. The body of the butterfly is the pinkie side of the child's hand and the wings are the individual hands. We called them after the child's name, this was Leslie's butterfly, so it's a Leslie-Fly. Just sharpie on some antenna and your good to go. This was a GREAT project and turned out adorable. It's a project I would take home and hang on my walls!

Sunday, October 17, 2010

More Cool Fall Stuff !

Okay, this week I FINALLY remembered to bring a camera with me to my classroom so I can post actual pictures of the cool stuff we do....


As I mentioned earlier, We are batty for books in the classroom - this is the wall directly above the library. I accented our cool bats with these cute spiders. I'm sure that EVERYONE knows that spiders are black circles with blue, yellow and brown feathers glued all over them! While I pre cut the legs, body and eyes the kids decorated their spider bodies with as many different crafty leftovers as I could find. Most of them love feathers so these spiders are certainly stylin' in wonderful fall coats!

As most of you wonderful readers have figured out by now I LOVE GLITTER, but sometimes my classroom just can't handle it. Everyone has off days and on those days I pull out the glitter equivalent which you probably have in your pantry and sweeps up WAY easier. For this easier to clean up project you'll need a food coloring, ziplock bags and white rice. Toss some rice into the ziplock, drip in a few drops of food coloring and shake it up! We made these great leaves with our multi-colored rice. Just cut a leaf out of construction paper, give your kiddo a cup of glue and go to town!
 
At this point I must stop writing or I'll run out of pictures by Wednesday... I am so excited with so many more projects to share! Thanks for reading!

Saturday, October 9, 2010

The leaves are really falling !!

Ohhhh, I love the weekend. I love the weekend more than I love Quiche day -- I know, that's a hard one to wrap your head around but I really, truly do! This week is fall themed.

To the theme "Have you ever seen a lassie"
The leaves are really falling
are falling
are falling
The leaves are really falling
'cause autumn is here....

There's red ones
and orange ones
and brown ones
and yellow ones
The leaves are really falling
'cause autumn is here

Leaf rubbings are a tried and true Autumn must be here activity. Take a nature walk and find all different types of leaves. Place the leaves under a piece of paper (which you may need to tape the paper down) take a crayon and rub the long side (wrapper off, of course) back and forth on paper, on top of the leaves. This will leave a very cool leaf pattern...

This rhyme is an all time favorite in my classroom.... The kids love it so much they will say it with me, or raise their hands to finish the sentence when I ask what the first pumpkin said...

5 Lil' Pumpkins sitting on a fence
The First one said " My it's getting late"
The Second one said " There's Witches in the air"
The Third one said " We don't care !"
The Fourth one said " Lets Run and Run and Run"
The Fifth one said "Lets have some fun"
and Whooooooooooooo went the wind
and (CLAP) OUT went the lights
and Five Lil' Pumpkins scurried outta sight.

Wednesday, October 6, 2010

What should we paint with today?


Yesterday was Quiche day - I love quiche day because our wonderful cook saves me the pie tins for our painting projects. It makes clean up a ton and a half easier.

Ahhhh paint.... what can I say, I love the stuff. You can never go wrong with putting paints in front of a kid. Finger paints, shiny paints, glitter paints (glitter... LOVE IT), poster paints, powder paints.... there are so many to use. Today I thought i'd share some super cool home additions to painting which can give your child a different experience every time they paint. All the ideas are completely kid friendly and budget friendly.


Mix the following products with regular tempera paints to get the desired effect...

https://blogger.googleusercontent.com/img/b/R29vZ2xl/AVvXsEjsdeBEt-dRLX25oLlRx6HVdZnqKgpcC8VaBQesAb-LAfLSepBuq_JTy77_n22ohItbHSzie6gxSoBk95w-VAuxKP3JyqTirCKp1tIHyf_5VYg8wZFZ3HNpEOcSmYUV7pxzLsjds0RWZg7P/s1600/PICT1307.JPGCorn Syrup - Makes your paint super shiny. It is thicker and takes a bit longer to dry, but the final product has such a sheen to it you might think it's still wet. We recently did paper plate pumpkins with orange corn syrup paint. The final product looks great on the class wall. * use something disposable or something you can pop the cap back on for future use with this one, it is super sticky to clean up and WAY easier just to toss when your done *

Condensed Milk - Add some condensed milk to you paint to give it a satin finish

Shaving Cream - Add some paint to tint the shaving cream, when the cream dries it looks like foam on the paper. The colors are not very bold, but it's a cool look anyway.

Liquid Dish Soap - Face Paint ! -- obviously take care about kid's eyes, but adding a smidge of liquid soap to your paint makes it super easy to come off skin. This is great for toddlers too, it makes clean up easier.

Here are some super cool things to do with that paint....
http://www.grapids.lib.mi.us/summerreading/kid7-bubble.png

Bubble paint with the liquid dish soap paint -- Put the paint in a pie tin (whoo hoo, Quiche day!) with an ample amount of water. Place a straw into the water and a piece of paper on top of the pie tin. Blow bubbles... the bubbles will pop on the paper and create a popped bubble effect. * Messy Warning * This project has the potential to get super messy in a classroom. I'd recommend small groups.

https://blogger.googleusercontent.com/img/b/R29vZ2xl/AVvXsEjzaeO_WhENXECy8fkP1Azw6K_RDV0bLo6N5dv_tO_IIRwlTwJV1xhxwxETkbNAQQ2lv8LikWx2ffxqOPy8-bSNw7srd_YDV74go577AKJI0G-toUeis7f7P7xM9PJ8trvHjEarj6_JeLBb/s1600/S4300005.JPGMarble Painting - On a cookie sheet place a piece of paper. Roll your marbles in some paint and put them on the paper. Allow the child to roll the marbles back and forth on the paper creating roads and paths.


Stuff to paint with -- hit up your kitchen drawers and find stuff to paint with. Egg beaters, basters, funnels - anything and everything makes a fun project!

http://gabrieladelworth.files.wordpress.com/2009/09/glitter-projects-copy.jpg?w=600&h=400As always don't be afraid to add stuff and give it a try. We've added glitter (I know, that's a shocker!), rice, corn, beans, corn starch, hand sanitizer.... just about everything to paint. Every new texture and mixture is a learning lesson. Not to mention the lesson they learn when the colors get combined.  I was once a frustrated teacher who only got her kids to make big grey blobs on the paper - until I discovered small paint brushes. They are much more apt to make detailed work when given the opportunity!

Tuesday, October 5, 2010

Reduce, Reuse and Recycle !!


Everyone is a fan of being green and recycling these days, preschoolers have this amazing knack for recycling everything over and over - in great new ways. Here are two great recycling projects which produce wonderful results.
Reuse those crayons! Crayons break, get worn down and lose their wrappers but should never be carelessly thrown away. Crayons are made of wax and all of us learned when we were younger and candles were lit, wax melts! -- I remember many days when mom wasn't looking when I covered my fingers with wax over and over... Yep, I was one of THOSE kids! -- Anyway - if you take your crayons and put them into muffin tins with cupcake wrappers you can remelt the crayons. I've done it a few times sans the wrappers and they are harder to get out, but you can get different shapes. Put them in the oven on a low warm setting and let them melt together for a good 5-10 minutes. If you haven't figured it out by now I can never just leave a project this simple. It's all about new things and adding more. I often times will mix crayon colors and add glitter. I've also added some silly stuff in the center for the kids to find as they use the crayons. It's a huge hit in the classroom, plus a great science project to boot!


The second project today is a little more crazy and time consuming. I did this project months ago with my class and would actually recommend doing it with a smaller group... compared to my twenty kiddos. Unfortunately when I did the project I didn't take pictures, thankfully I was able to find one on the web that will give you an solid concept of the project. Rolled newspaper forts... Take 4-5 sheets of newspaper laying on top of each other. Roll the paper at a diagonal from corner to corner. Tape it together with masking tape to form a stick. Make at least 10 - 15 of these paper sticks. Once the sticks are made use more masking tape (you'll use nearly a roll for this project) to tape them together and create joints.
Continue to work your way around connecting the joints at until you have 5 together for the top. Continue down to create a fort stemming off from the top five. (see the picture... it helps in explaining) eventually you are going to create a house that the kids LOVE to climb in and out of. I also used this same technique to create a 3D umbrella coming off of my wall during our ocean / beach theme. I just did half of the top and covered it in paper. It was a super cute addition to the room!

Monday, October 4, 2010

Clean Mud !

Today was a crazy day in our classroom. With the upcoming holiday season everyone is excited and high energy. On days like today I pull out the tried and true kid pleasing activities. Clean mud is one of those projects you can do everyday for three weeks and the kids still love it. After about a week I post the recipe in my classroom and send the kids home with clean mud in baggies to share with their parent's and siblings. I've even had parents come in and play with their child in the mud before they go home. It's always great to see parents and kids having a blast together!


Materials:
6 rolls cheap (the cheaper the better) toilet paper
2 bars of Ivory soap (made into soap flakes with a cheese grater)
1 1/2 c. Borax
Water

Take that toilet paper and throw it across the room. Unravel every inch of all six rolls... In my classroom we have toilet paper fights. When everyone is done throwing toilet paper toss all of it into a big tub. You can use a sensory tub or a bucket - whatever suits you! Next your going to combine the ivory soap flakes and just enough water to dissolve the flakes. Pour this into the tub, on top of the toilet paper. Take the same container and pour 1 and 1/2 cups of Borax. Again, add enough water to dissolve all the borax and dump into the container with the toilet paper and ivory soap. The toilet paper does not break down nearly as well without the borax, so I would not suggest leaving this step out! -- The next step is the best -- Mash it up! The more mixing you do the more it turns into a mashed potato consistency. 
I would suggest using this on a hard, sweepable floor - if you let the drops dry a few minutes they are easily swept up with a broom, making this a very easy project to clean up. If you keep it covered it should last at least a week. I usually put something into it like powdered tempra, glitter, food coloring... anything you can get your hands on is always fun!

Saturday, October 2, 2010

Pumpkins, Bats and Candy Corn -- Oh My !!

It's October and Halloween is just around the corner. I can't help be excited for autumn, I am truly a sucker for seasonal changes. Right now hanging from my ceiling are these adorable pumpkins. This was a new project for me and it took a few trials before we got it right but they turned into a great art piece for the room.

 
The kids completely enjoyed using their small motor skills (these skills will help later when it comes to writing and drawing!) stapling and cutting the leaves for the top. The prep work was super easy with cutting the strips of construction paper. This was a project we did in small groups (2-3 kids at a time) as they need some help with the stapler and getting the paper to bend correctly. Everyone started off with one piece of paper for the middle section (which remains straight) and stapled out alternating sides. It worked best when we stapled the middle strips first and worked out way out this tactic definitely helped the outside strips bend better. At the end we cut off the excess paper from the bottom and glued on some leaves to cover up the staples. These look adorable hanging from the ceiling, it's an inside pumpkin patch!
Materials: Orange & Green Construction Paper, Stapler, Scissors
Time: About 5 minutes per pumpkin (once you get the hang of it! )


This second project I wasn't too sure about until I did it. Sticking with our classroom Halloween theme I wanted to do something for the wall in out library area. The kids painted some big black pieces of paper, printed across the paper in bright pink is " We're Batty About Books ". I used this bat project to put some art on the wall. It turned out much cuter than I expected. -- I haven't taken a picture of the wall yet, i'll put it on my list of to-do's for Monday.


On a piece of construction paper have the kids make two hand prints. Use your imagination for which medium to use. My classroom used black paint, however ink, glitter paint, puffy paint... they're all good options! We did our hand prints on a half sheet of construction paper, glued the bat face down and then mounted it on another piece of construction paper. These bats are now happily flying on the wall over our "Batty About Books" library! It was a super easy and simple project that turned out great!
Materials: Construction Paper (two colors), Paint, Glue, Pre-Cut Bat heads
Time: 10 Minutes per child